LVM in Linux — Create and Extend a Logical Volume
How to create an LVM Logical Volume:
Before diving into extending/growing an existing Logical Volume, let’s see how we can create one from the scratch on a system where it has not been set up before, and then, we shall extend it in the next section. If you only wish to extend an existing LV, you can skip this section.
To set up a new Logical Volume, we need to proceed in the following order:
- Create physical volume or volumes from the existing hard drives.
- Create a Volume group and add the physical volumes to it.
- Create a Logical Volume from the Volume Group.
- Format the Logical Volume as required — xfs, ext4 etc.
- Finally, mount the new filesystem.
— We do need to have disk space available to create a physical volume. On this server (a virtual machine) we have two separate raw hard drives that we will be using for our Logical Volume creation demo.
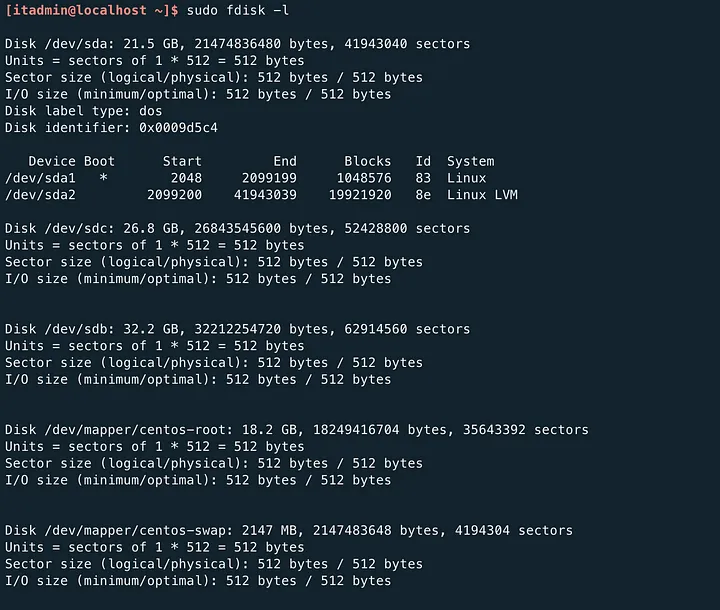
We can see we have /dev/sdb and /dev/sdc which are two raw disks, they are not yet available and cannot be used, so we need to format them.
Let’s look at this quick demo on how we can make this new disk /dev/sdb available:
A few things about what we have done:
- We are making this raw new drive /dev/sdb available by creating a new partition and assigning the proper label to it.
- We have not specified a specific size for this partition but chose the default which is to use the whole disk, hitting enter without specifying any size will allocate the whole space available.
- The crucial part here is to choose “8e” Hex code which will label this new partition and assign it as an LVM type, if we wanted to create an ext4 partition then the label code would be different. For every new partition created, it has to be labelled before it can be used.
- “w” is required to save the changes we have made.
Now that our disk is ready, let’s start by creating a physical volume with pvcreate:
[itadmin@localhost ~]$ sudo pvcreate /dev/sdb1
  Physical volume "/dev/sdb1" successfully created.
[itadmin@localhost ~]$
Our Physical volume has been created! Let’s check whether our PV was indeed created with the help of pvdisplay (pvs can also be used):
[itadmin@localhost ~]$ sudo pvdisplay
[sudo] password for itadmin:
  --- Physical volume ---
  PV Name               /dev/sda2
  VG Name               centos
  PV Size               <19.00 GiB / not usable 3.00 MiB
  Allocatable           yes (but full)
  PE Size               4.00 MiB
  Total PE              4863
  Free PE               0
  Allocated PE          4863
  PV UUID               sa3xFR-jbDb-SKuS-yQN1-VzzW-bveG-aA0yha"/dev/sdb1" is a new physical volume of "<30.00 GiB"
  --- NEW Physical volume ---
  PV Name               /dev/sdb1
  VG Name
  PV Size               <30.00 GiB
  Allocatable           NO
  PE Size               0
  Total PE              0
  Free PE               0
  Allocated PE          0
  PV UUID               Q54fqC-Np3X-XUaF-j5vE-Px29-pT9H-JYsDUh[itadmin@localhost ~]$
We can see we already had a PV /dev/sda2 meaning the root partition is also built on top of a logical volume. The new disk /dev/sdb1 is now a physical volume. We can notice that the VG Name of this new physical volume is empty! that is because it has not been added to a volume group yet!
Let’s do that right now:
[itadmin@localhost ~]$ sudo vgcreate vg-data /dev/sdb1
  Volume group "vg-data" successfully created
[itadmin@localhost ~]$
- we use vgcreate to create a new volume group, assigning a name to this new volume group and adding the physical volume or volumes to it, in this case, we make /dev/sdb1 part of this VG.
Let’s check our newly created volume group:
[itadmin@localhost ~]$ sudo vgs
  VG      #PV #LV #SN Attr   VSize   VFree
  centos    1   2   0 wz--n- <19.00g      0
  vg-data   1   0   0 wz--n- <30.00g <30.00g
[itadmin@localhost ~]$
- vg-data is indeed there and has 30GB free — which is the size of the physical volume(the new partition) we added earlier.
Now, we create the logical volume with lvcreate:
[itadmin@localhost ~]$ sudo lvcreate --name lv-data -l 100%FREE vg-data
 Logical volume "lv-data" created.
[itadmin@localhost ~]$
- -l : is used to specify how much space we wish to take from the volume group, here we allocate 100% of it, we do need to mention the volume group name in our command.
Checking the new Logical Volume with lvdisplay :
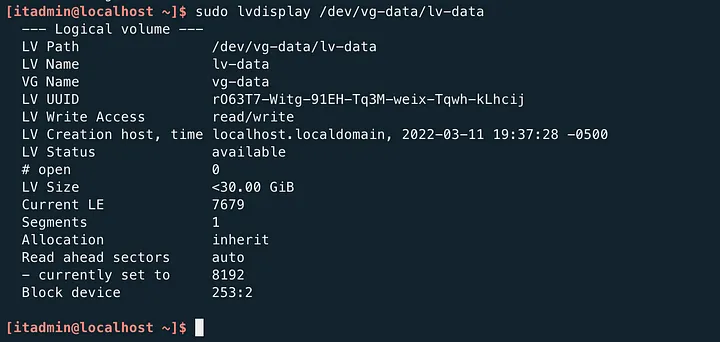
Our Logical Volume has been created!
The final step we should take to be able to use this logical volume is to format this new LV, we do this with the help of the mkfs.xfs command:
[itadmin@localhost ~]$ sudo mkfs.xfs /dev/vg-data/lv-data
[sudo] password for itadmin:
meta-data=/dev/vg-data/lv-data   isize=512    agcount=4, agsize=1965824 blks
         =                       sectsz=512   attr=2, projid32bit=1
         =                       crc=1        finobt=0, sparse=0
data     =                       bsize=4096   blocks=7863296, imaxpct=25
         =                       sunit=0      swidth=0 blks
naming   =version 2              bsize=4096   ascii-ci=0 ftype=1
log      =internal log           bsize=4096   blocks=3839, version=2
         =                       sectsz=512   sunit=0 blks, lazy-count=1
realtime =none                   extsz=4096   blocks=0, rtextents=0
[itadmin@localhost ~]$
. mkfs stands for “make a filesystem”, which is what it does. In this case, we want to have an xfs filesystem hence mkfs.xfs. The xfs filesystem is an upgrade from ext4 in many aspects and is the default filesystem with RHEL servers, that said, there are advantages of using ext4 over xfs, depending on the situation.
We want to mount this newly created logical volume on a mount point, let’s create it and proceed:
[itadmin@localhost ~]$ sudo mkdir /data
[itadmin@localhost ~]$ sudo mount /dev/vg-data/lv-data /data
We created a brand new directory where our new filesystem will be mounted, anything under /data will belong to this new logical volume.
— As a side note — we do need to add any new mount point in the: /etc/fstab file so it persists throughout reboots.
Let’s have a look at our newly mounted /data directory with the df command:
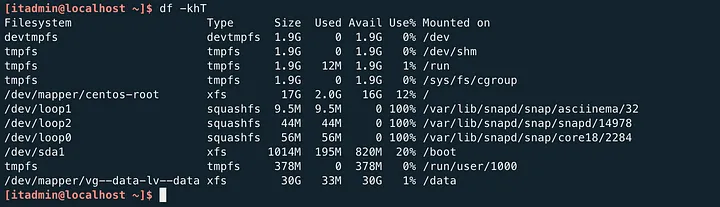
- We need to check whether the filesystem is indeed XFS hence the “T” switch in our df command, which is used to show the filesystem type.
- Our logical volume lv-data is all ready and mounted on /data!
Task completed!